AWS static website with SSL and
custom domain name
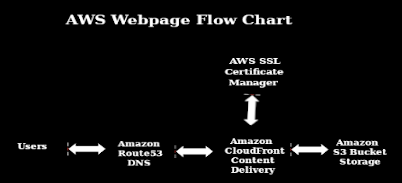
Creating an AWS static website. Complete with SSL and custom domain name. We will take you step by step, from creating an account with permissions, to using Route 53, S3 buckets, Certificate Manager, and CloudFront.
In this tutorial we will be establishing a website with AWS:
- Get started setting up a root account and management account
- Register a new domain using Route 53
- Set up an S3 bucket
- Create an SSL certificate for HTTPS
- Set up permissions in CloudFormation
- Create a CloudFront distribution
- Link CloudFront, S3, custom domain, and SSL certificate via Route 53
AWS Services is a large scale solution for enterprises. AWS has a large amount of documentation. ( I printed over 200 pages for this project!) It took me a week to set up new accounts, and create a solution. Only a small portion of what AWS provides was used. In the end I had an SSL enabled static website, with a custom domain name. Most of the resources used are free. It costs $13 per year for a .com domain name, and $1 to $3 per month for the hosting. The following is an outline of what we will be doing. You must read all online details on the AWS console as you progress through the outline.
- We will start by creating a root account protected with MFA.
- Next a management account will be created.
- Then get started with the IAM Identity Center
- In IAM Identity Center we will create an administrative user with administrative permissions.
- Join an AWS Organization where we will enable all features.
- We will then register a domain name.
- Create an S3 bucket where our webpages (objects) are stored.
- Create public access policies for the use of the webpage (S3 bucket).
- Use AWS Certificate Manager to create an SSL certificate.
- Setup permissions in CloudFormation
- Configure a CloudFront distribution (essentially the web server).
- Use Route 53 to create records linking the domain name, to the SSL certificate, to the S3 bucket, and to the CloudFront distribution.
We will use the following AWS resources:
- IAM Identity Center
- AWS Organizations
- Route 53
- S3
- AWS Private Certificate Authority
- CloudFront
- AWS Health Dashboard
- AWS Cost Explorer
1.0 Create Root and Management Accounts
1.1 Create and activate a new AWS account.
- Search Google for Sign up for a free AWS account and click on Create a Free Account. Follow the online instructions. (When asked, Activate IAM Access.)
- It is suggested to create an account name of the following form steve-larson-admin. Where admin is the purpose of the account.
- Verify your email address. Wait a couple minutes for the verification email.
Create your password and confirm the password.
- Add contact information. Accept the AWS Customer Agreement and choose Continue.
- You will receive a confirmation email. You can sign in with your new account.
- Add a payment method. On the Billing information page enter your payment method, can choose Verify and Add.
- Verify your phone number. Enter the PIN you receive. Choose Continue.
- Choose an AWS Support plan. Choose Complete sign up.
- Wait up to 24 hours for account activation. You will receive a confirmation email.
- When you sign up for the AWS account, a root user is created. The root user has access to all AWS services and resources in the account. Eventually you will need to provide MFA (multi-factor authentication) for the root account. I use two forms of MFA. The first is Google Authenticator on my phone, and the second is a YubiKey 5 NFC device.
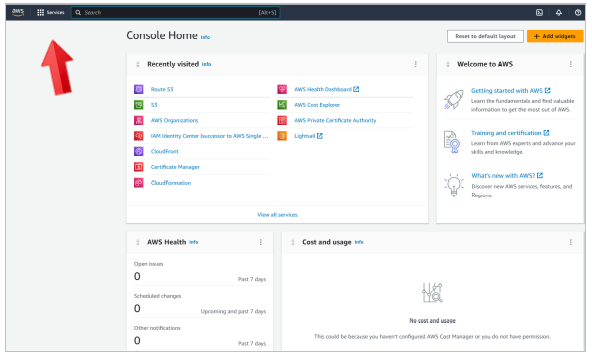
- This is the way your console home page will look after all services are added at the end of your project. The red arrow points to the Services icon. It is here that you can select services.
1.2 Getting started with IAM Identity Center
- Select IAM Identity Center from the Services icon at the top left of your page. Choose US-East(N. Virginia) Region, to be consistent with where you will create SSL certificates. Click on Enable.
- You will be prompted to join an Organization. Click on Create AWS organization. You will receive an email to verify your email address for AWS Organizations. Wait a few minutes for AWS Organizations and AWS IAM Identity Center to be enabled. You will see the IAM Identity Center Dashboard.
-
Click on Choose your identity source. The identity source will be set to Identity Center Directory.
1.3 Create an administrative user in AWS IAM Identity Center
- Here we are going to add you, the root user, as an a regular user. You will have two user accounts: root user, and regular user.
- Open the IAM Identity Center console. Choose Users.
- Choose Add user. Provide a Username. I suggest a name with all small characters and no spaces. Something easy to remember.
- For the Password choose the default method. Send an email with the password setup instructions. This option automatically sends an email to the new account.
- Enter the email address for the new account and verify. Enter you first and last name.
- Choose Next.
1.4 Enable or Disable MFA for a User
- Go to the IAM Identity Center console.
- In the left navigation pane choose Users. Select the user you are interested in.
- In the left navigation pane, choose Settings.
- On the Settings page, choose the Authentication tab.
- In the Multi-factor authentication section, choose Configure.
-
On the Configure multi-factor authentication page, choose one of the following authentication modes based on the level of security that your business needs:
a. Only when their sign-in context changes (context-aware)
b. Every time they sign in (always-on)
c. Never (disabled) While in this mode, all users will sign in with their standard user name and password only. Choosing this option disables IAM Identity Center MFA.
- Choose Save changes.
1.5 Create an administrative permission set
- In the IAM Identity Center navigation pane, under Multi account permissions, choose Permission sets.
-
Choose Create permissions set.
a. Select permission set type. On the Select permission set type page, keep the default settings and choose Next. The default setting grants full AdministratorAccess.
b. Specify permission set details. Keep the defaults and click Next.
c. Review the permission set and confirm that it says AdministrativeAccess. Choose create.
1.6 Granting the administrative permission set to the new user account
- In the IAM Identity Center under Multi-account permissions, choose AWS accounts.
- Select the new user account you will give administrative permission to.
-
Choose Assign users or groups.
a.Select users and groups. On the Assign users and groups to “AWS-account-name” page, do the following. On the Users tab select the user you want to grant administrative permissions to. Choose Next.
b. Select permission sets, on the “AWS-account-name” page. UnderPermission sets, select the AdministratorAccess permission set. Choose Next.
c. Review and Submit, on the “AWS-account-name” page.
- Wait for the user assignment process to complete. It may take a couple minutes.
1.7 Exit the root account, and login with the administrator account you just created as IAM user.
Use the administrator account from now on. Login using the URL given in your email.
1.8 Create and join an Organization with your new account. Enable all features.
- Open the AWS Organization console. An organization should have been created when you setup IAM Identity Center. AWS creates the organization and shows you the AWS accounts.
- On the Settings page choose Begin process.
- On the Enable all features choose Begin process.
- An email will be sent to your invited account. Approve the request in the email you receive.
- Finalize the process to enable all features. Accept. If the invited account accepts the request. On Settings, choose Go to finalize in the green box.
- On the Enable all features page, choose Finalize. In the confirmation dialog box, choose Finalize again.
- The organization now has all features enabled.
2.0 Your account is setup. Start the website setup.
2.1 Use AWS to register a domain name
It simplifies website creation if you acquire your domain name through AWS. It costs $13 per year for .com domain name.
- Navigate to Route 53. Click on Get started.
- Select Register a domain. Click on Get started.
- Choose a domain name. Check the name. Add it to the shopping cart. Continue.
- Enter contact details for your domain name. Check details. Continue.
- A verification email may be sent. Confirm.
- Registration may take up to 3 days. You will receive an email confirming registration.
2.2 S3 Bucket
In this section, we are going to create an S3 bucket, open the bucket for public acess, set it up for static website hosting and upload a simple static website to it. We will test viewing our website from outside of AWS.
2.2.1 First, we are going to create an S3 bucket:
- Go to your AWS console and search for S3. Click it.
- Click ‘Create Bucket’. Choose a domain name for the bucket name i.e., example.com. Choose the US East (N.Virginia) region.
- Untick Block all public access and acknowledge the change, since we want our static website accessible from the internet.
- Select acknowledgment disclaimer.
- Bucket Key for KMS – Disable.
- Click Create bucket.
2.2.2 Then we need to open the bucket to public:
- Open the bucket you just created from the console. The bucket should be empty.
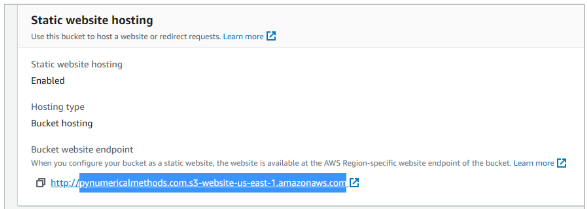
- Click Properties, scroll down to Static website hosting and click Edit.
- Choose Enable under Static website hosting.
- Choose Host a static website.
- Choose an Index document and an Error document. You can fill in index.html into both.
- Choose Save changes.
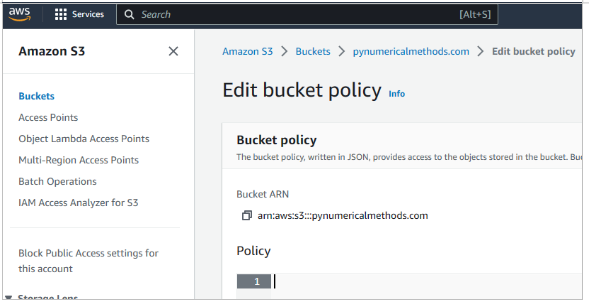
2.2.3 Finally, we have to edit the Bucket Policies.
- In S3, select Permissions. Then Bucket Policy.
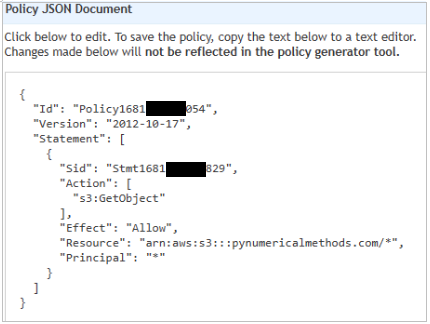
- Here you fill in a policy which will allow the bucket to be publicly accessed. Use the official AWS Policy Generator for these purposes. Open a new browser window and search for AWS Policy Generator. Open the link to the AWS Policy Generator.
- At the generator, you need to choose S3 bucket policy as the Type of Policy. Principal will be “*” (without quotes). Actions will be GetObject. “1 Action Selected” will show in the box after it is selected.
- Switch browser windows back to the S3 bucket page. Click Edit in the Bucket Policy. Copy your ARN, which can be found in the Edit Bucket Policy. The ARN is in the format arn:aws:s3:::bucket_name.
◦ - Switch back to the AWS Policy Generator window and paste the ARN.
- Important: After you paste in the ARN, append a slash and asterisk at the end, so it will look something like: arn:aws:s3:::bucket-name/* (your bucket name is different). This will allow access to everything inside the bucket. Click Add Statement.
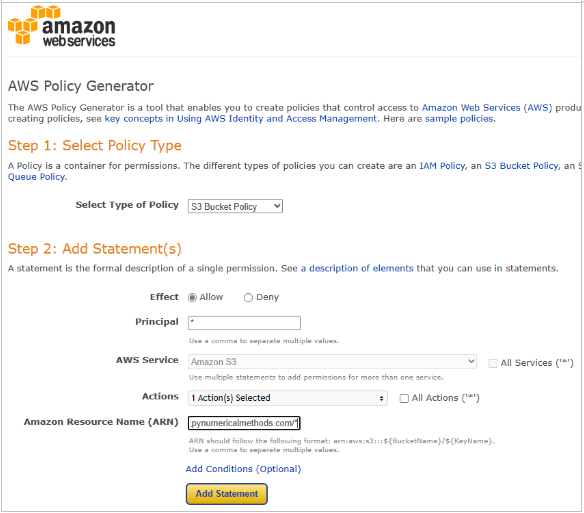
- Finally, click Generate policy.
- Copy and paste the whole policy over to the S3 AWS console in the Bucket Policy.
- Click Save Changes.
That is all for our S3 Bucket setup. Open your bucket. Under Permissions you should see a red bubble with white text Publicly accessible under the name of your bucket. If you do, everything is correct and we can proceed.

2.2.4 Next, we’re going to upload dummy website files into the bucket & test access to it:
- Prepare a sample index.html page on your computer. We will upload it to the S3 Bucket.
- In your AWS console inside your S3 Bucket press Upload. Then Add files and upload your index.html file. Press Upload. Do not use encryption.
- Once the file is uploaded, click on index.html within the S3 bucket and locate “Object URL”. Click it. You should see your index page.
- Congratulations – you’ve just set up an S3 bucket, uploaded a website and opened it for public access.
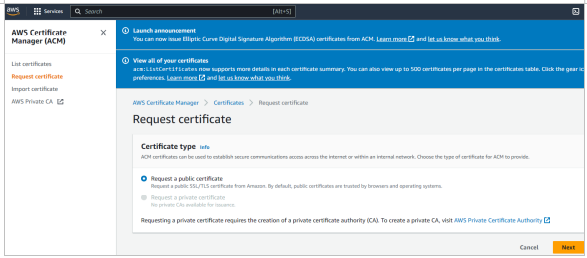
2.3 AWS Certificate Manager (ACM)
- In your AWS Console search for Certificate Manager and click the link.
- Important: You have to select the US East (N.Virginia) region. CloudFront recognizes only this region for it's ACM certificates.
- Click Get started under Provision certificates
- Click Request certificate. Select Request a public certificate.
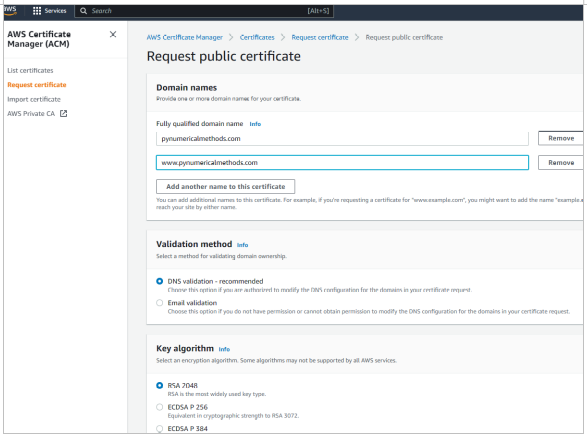
- Fill in the Domain name such as example.com.
- Choose Add another name to this certificate, and type www.example.com in the text box.
- Choose a method of validation. DNS validation is recommended.
- Click on Request.
- Click View certificate.
- On the next screen you’ll see that the certificate status is Pending validation.
- Under Domains, click on Create record in Route 53 button under Domains.
- Choose Create records. The Certificate status page should open with a status banner saying Successfully created DNS records.
- Your new certificate may continue to display a status of Pending validation for up to 30 minutes.
2.4 CloudFormation IAM Roles
2.4.1 Setup permissions for Stack Sets Operations
In order to add an AWS account, the administrator account needs to have permission to create, update, and delete any stack sets in all target accounts. (Only needs to performed one time, upon account creation). IAM roles need to be created in both the administrator and the target accounts. Amazon has simplified this process by utilizing an AWS Cloud Formation template. Complete steps 1 and 2 before proceeding with AWS Cloud Formation.
Step 1 - Create IAM role for administrator account
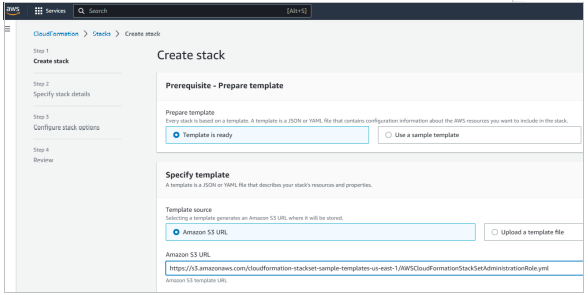
- From AWS Services menu, search and click on CloudFormation.
- Click on Stacks in left navigation menu.
- Click on Create stack, and select With new resources(standard).
- In Specify template section, select Amazon S3 URL. Under it copy and paste the following hyperlink URL: https://s3.amazonaws.com/cloudformation-stackset-sample-templates-us-east-1/AWSCloudFormationStackSetAdministrationRole.yml, and click Next.
- In the Stack name field, give any Stack name, then click Next.
- In Step-3: Configure Stack options, scroll down, and click Next.
- In Step-4: Review, scroll down, check to acknowledge AWS CloudFormation to create IAM resources, then click Create stack to complete the process.
Note that the IAM role name for the administrator account must be AWSCloudFormationStackSetAdministrationRole.
Step 2 - Create IAM role for each target account
- From AWS Services menu, search and click on CloudFormation.
- Click on Stacks in left navigation menu.
- Click on Create stack, and select With new resources(standard).
- In Specify template section, select Amazon S3 URL. Under it copy and paste the following hyperlink URL: https://s3.amazonaws.com/cloudformation-stackset-sample-templates-us-east-1/AWSCloudFormationStackSetExecutionRole.yml, and click Next.
- In Stack name field, give any Stack name.
- In Parameters field, enter the administrator account ID. The ID is given when clicking on Administrator in the upper right corner. Then click Next.
- In Step-3: Configure Stack options, scroll down, and click Next.
- In Step-4: Review, scroll down, and check to acknowledge AWS CloudFormation to create IAM resources, then click Create stack to complete the process.
Reference: https://docs.aws.amazon.com/AWSCloudFormation/latest/UserGuide/stacksets-prereqs.html
2.5 CloudFront Distribution
In this section, we are going to create a CloudFront distribution with an S3 bucket so that when anyone tries to access our distribution, they will be accessing the S3 bucket.
2.5.1 Create CloudFront distribution
- In your AWS Console search for CloudFront and click the link.
- Click Create Distribution. We want a web distribution.
- You should see an Origin settings page with many options and fields.
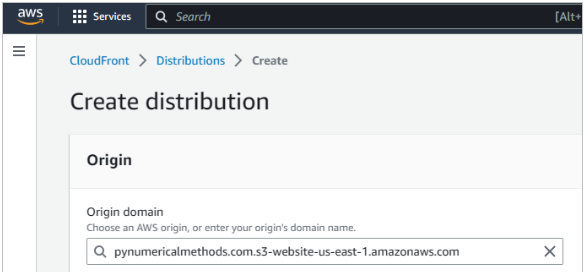
- For the Origin Domain Name, go back to your S3 management console (Services -> S3). Leave the CloudFront setup page open. Once in the S3 management console, click on your bucket name, then click Properties and scroll down to Static website hosting. Highlight the end part of the Endpoint URL. (Note: Press the Alt key while highlighting the text in the hyperlink. It enables you to copy text in the hyperlink. Copy using Ctrl-C.)
- Return to the CloudFront setup page and paste the URL inside the Origin Domain Name field. AWS offers you an S3 option from the drop down list, but that does not point to the actual website.
2.5.2 CloudFront SSL certificate:
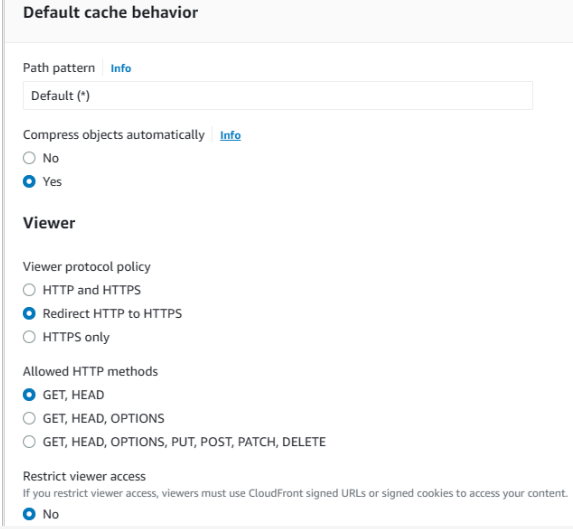
- Under Viewer Protocol Policy choose Redirect HTTP to HTTPS
- Now scroll all the way down to the Alternate Domain Names (CNAMEs) field and type in your domain names without http(s), i.e. example.com. Repeat for www.example.com.
- Under Settings, choose Custom SSL Certificate for CloudFront SSL encryption. The SSL certificate you setup earlier should be offered to you. Choose it.
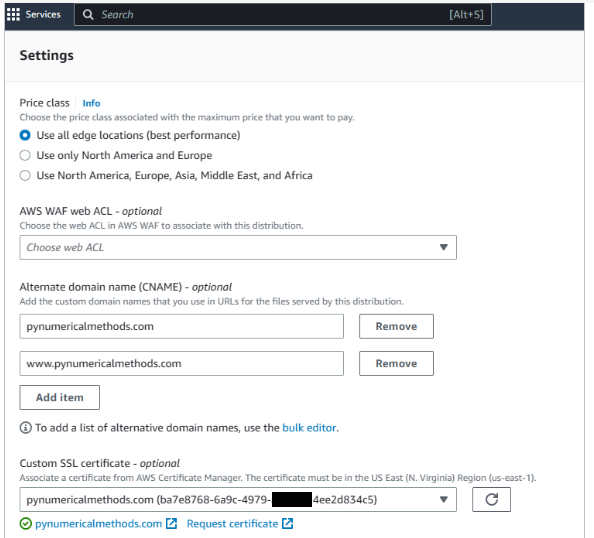
-
IMPORTANT. Under Default root object – optional you must fill in the name index.html. Otherwise you will get an XML access denied error when you open your webpage later.
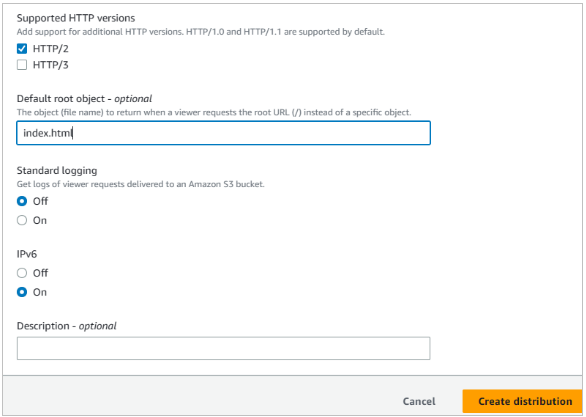
- That's all. Click Create Distribution at the very bottom of the page.
- The distribution takes about 10-20 minutes to provision. Once it is provisioned (Status = Deployed, State = Enabled), you can test it by pasting the URL under Distribution Domain Name into your browser. You should see the website you uploaded into S3.
We are almost done, we have S3, CloudFront SSL certificate, but there's one more step we need to take. If you go ahead and try to load your domain name in your web browser, you'll notice that the page can't be loaded. We have to create a record in Route 53. Basically we tell it to direct traffic from your domain to your CloudFront distribution.
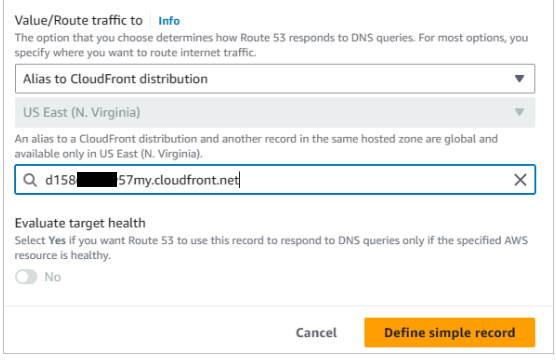
2.6 Route 53 Create Records
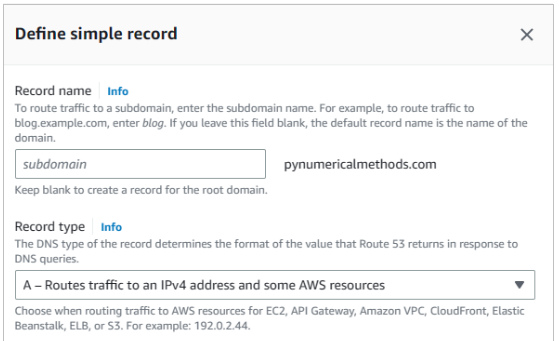
- Click Services and select Route 53, click the link. Click the name of your hosted zone.
- Click Define simple record.
- Click the dropdown menu at Value/Route traffic to, and choose Alias to CloudFront distribution.
- Choose the distribution you created previously.
- (Notice that the only available region is US East (N. Virginia). This is due to the fact that we created an SSL Certificate via AWS Certificate manager. This service is only available in US East.)
- Click Define simple record.
- Click Create records
- Repeat the above Create record procedure for the subdomain www. Use www in the Record name field.
And that's it. All you have to do now is wait a few minutes for the DNS records to update and try to load your domain name. If everything went correctly, you should see your static website distributed via CloudFront. If you get error messages, you made an error. Google the error and make corrections.
3.0 References
- It is obvious that googling AWS with the service name will bring up AWS documentation for the section you are working on. There are large amounts of documentation.
- If you get an error or things don't look right; again, google the error. Chances are someone else has had a similar problem.
- I suggest reading two online articles. The first is by Ivo Fibiger, AWS Solutions Architect. It is called Setup an Amazon CloudFront distribution with SSL, custom domain and S3.
- The second online article is from the FORTINET Documents Library. It is called Setup permissions for Stack Sets Operations.